6.1 Gain and Feedback
In this chapter, we will consider two phenomena related to waves that have numerous important technologic and scientific applications: feedback and the Doppler effect. While you may be somewhat familiar with the Doppler effect, you may be wondering what I mean by feedback and why it is important to anyone. The answers to these questions will be the focus of this section and the next.
The one example of feedback that most people are familiar with is the screeching noise that sometimes is created when someone is talking into a microphone and the volume is turned up to high. It can also occur when a musical group is playing and, again, the microphones are turned up too high. Actually, some groups use feedback intentionally to produce a particular kind of sound.
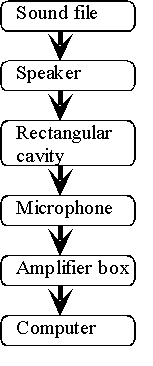
So, what exactly is feedback? All of the labs that we have worked with, so far, can be considered linear. For example, to study the 2-D cavities, we played an audio signal through a speaker. The sound from the speaker set up standing waves in the rectangular cavity. A microphone then detected these waves and the small audio-amplifier box increased the signal level of the output of the microphone. Finally, the output of the amplifier was displayed on the computer. The following flow chart describes this schematically:
Again, this is a linear system, which means that the signal moves in a single direction and elements farther down the flow chart to do not influence earlier elements. For example, the output of the microphone does not affect the sound file.
In a system showing feedback the flow of the signal is not so simple: later elements can affect earlier elements. For example, what would happen if we took the output of the amplifier box and connected it to the input of the speaker? Now, we would have the following flow chart:
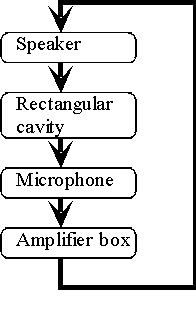
This arrangement has fewer elements, and so it may appear to be simpler than the first, but since it is not connected in a simple way, its behavior is actually much more complicated. However, we can get an idea of where the term "feedback" comes from. In this example, the output of the amplifier box is "feed back" into the input of the speaker. In this way, later elements can affect earlier ones. This makes it difficult to figure out what it is going to do! The output of the amplifier box drives the speaker, which creates waves in the cavity, which produces a signal in the microphone, which serves as the input to the amplifier, which changes the output of the amplifier – and the whole cycle starts over again. Because the signal travels through the flow chart in a loop, these systems are often referred to as a "feedback loop". In the lab, we create the feedback loop in the following way:
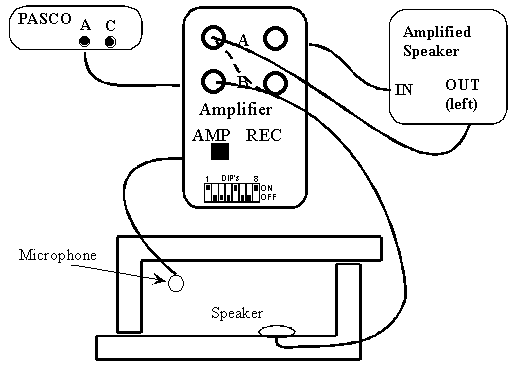
See if you can follow the signal through the set-up. In this experiment, we actually need a little extra amplification from the computer speaker box.
Now that we have some idea of what a feedback loop looks like, let’s start to analyze one. Since it is a loop, we can start anywhere and follow the signal around the loop. Let’s just assume, in the example above, that there is a signal of 0.1 V on the speaker. This will produce a wave of a certain amplitude in the rectangular cavity. This wave, in turn will produce an output signal from the microphone. Much of the energy in the initial signal going into the speaker will be lost in the cavity and the microphone, so the signal coming out of the microphone will be much smaller. As an example, let’s say that it will be 100 times smaller. So, instead of 0.1 V going into the speaker, we will only have 0.001 V coming out of the microphone. This reduction in the signal level is called loss. It is because microphones only produce very small signals that we need amplifiers. Finally, let’s say that the amplifier increases the signal by a factor of 10. This helps the signal out of the microphone a lot, increasing it from 0.001 V to 0.01 V. Now, this signal is feed back into the speaker to complete the feedback loop.
But, what has happened? We started by saying that there was 0.1 V on the speaker, and after going through the loop, we only came up with 0.01 V, or a signal 10 times smaller. So, when this new signal goes through the loop, it will be 10 times smaller, again, or 0.001 V. The signal keeps going around the loop getting 10 times smaller each time. Very quickly, there will be nothing left to the signal. Since there is actually no signal to start with, there never will be a signal.
Now we will change the situation slightly. Instead of a increasing the signal out of the microphone by only a factor of 10, let’s make the increase a factor of 200, which is more typical of a microphone amplifier. Starting again with a signal of 0.1 V on the speaker, there will be a signal of 0.001 V out of the microphone. However, the amplifier will now increase this to 0.2 V and send it back to the speaker. This signal is larger than the one we started with. If we have 0.2 V on the speaker, there will be 0.002 V out of the microphone, which will be amplified to 0.4 V and sent back to the speaker. This is now a very different situation than we had before. Instead of the signal getting smaller on each loop through, it gets larger. In fact, no matter how small the signal is originally, it will grow and grow until it becomes very large. So, even though there is no obvious source for sound in this set-up, if the amplifier is set high enough, it will spontaneously start making a noise.
What determines how large the signal will get – as it clearly not grow indefinitely? An amplifier, like the amplifier in your stereo system takes a weak input signal and makes it stronger so that it can drive the speaker. Amplifiers increase the input signal by a constant factor, called the gain. In the examples above, we considered gains of 10 and 200. The only problem comes when the input signal is too large. The amplifier tries to increase this signal by its gain factor. However, there is a maximum output signal that the amplifier can produce. Bigger amplifiers can produce a bigger output signal, but every amplifier has some limit. Once this limit is reached, the amplifier cannot produce a bigger output signal. This is called saturation. In the second feedback loop that we considered above, the signal got bigger on each pass through the loop. However, at some point, the amplifier stops increasing the signal, and the signal reaches a constant level. When the circuit is turned on, the signal rises rapidly, until the amplifier reaches saturation, at which point the signal stays constant.
Although the example may seem somewhat complex and technical, there are a couple of general principles that apply to all feedback loops. In any loop, there is loss. In the example above, the signal can get weak because all of the sound from the speaker does not go to the microphone (loss in the 2-D cavity). There is also loss because the microphone does not turn all of the sound it receives into electrical energy. Loss decreases the signal by a constant factor. To compensate for this, feedback loops require a source of gain. In the example above, the audio amplifier provides this gain. The amplifier increases the signal by a constant factor, but only up to a point when the amplifier saturates.
For feedback to occur, the gain must be greater than the loss. For example, the loss may be a factor of 100 – that means that the signal is reduced by a factor of 100. If the gain is 10, the amplifier partially makes up for the loss, but not completely, and as we saw in the example above, there will be no signal. However, if we increase the gain by turning up the volume on the amplifier to 200, the gain now is greater than the loss. The signal is decreased by a factor of 100 by the loss and increased by a factor of 200 by the gain, resulting in an overall gain that is 200/100 = 2. It is this overall gain that determines what the feedback loop will do. If the overall gain is greater than 1, feedback will occur. If it is less than 1, no sound will be produced. The gain on the amplifier affects this overall gain. If we start with the volume very low, the overall gain will be much less than 1 and nothing will happen. If we start turning up the amplifier, the overall gain will get bigger, but as long as it is less than 1, nothing will happen. At some critical point, as we keep turning up the volume, the overall gain will become greater than 1 and suddenly feedback will occur and we will hear sound. This is a very sharp threshold, as the overall gain has to simply go from just less than 1 to just barely greater than 1.
So far, we have determined the conditions that will produce feedback – there must be a feedback loop and the overall gain of the loop must exceed 1. But, an equally important question is what will be the frequency of the feedback? In section 4.2 we saw that a 2-D cavity can be described by a series of overtones, or resonances. If the frequency applied to the cavity were equal to an overtone, the microphone would produce a large output signal. To put this in the context of this section, a frequency equal to an overtone of the cavity will have the smallest loss. As a result, an overtone will have the largest overall gain. So, in our experiment where we start with the volume very low and slowly turn it up, the first frequency to show feedback will be an overtone (or the fundamental) of the cavity. Once feedback starts on a particular frequency or overtone, the feedback will generally continue on that frequency. This is because, once the amplifier has saturated, it losses it ability to amplify other frequencies, as well. In this way, feedback at one frequency suppresses all other frequencies.
There is one final consideration for determining which overtone, or cavity mode will produce feedback. This consideration is related to the ideas of constructive and destructive interference from the last chapter. Basically, if two waves are in phase, they support each other and the resultant wave is larger. If the waves are out of phase, they will cancel each other out. In the feedback loop, there is an initial input wave that travels through the feedback loop back to the input. If the gain of the loop is greater than 1, feedback should occur. However, this requires the resultant wave to be in phase with the initial wave, otherwise they will interfere destructively and cancel each other out. Thus, the requirement is that the overall gain is greater than 1 and the feedback loop keeps the input and output waves in phase. Why this is important is that a cavity can change the phase of the input signal. At certain points in the cavity the output is in phase with the input, at other points it is out of phase. The placement of the microphone in the cavity controls whether the output is in phase or out of phase with the input. In fact, on one side of a nodal line the signal will be in phase, on the other side it will be out of phase. This is a rather subtle and complicated aspect of feedback, but it is necessary to have some sense of this affect in order to understand which mode feedback will occur on.
Actually, one rather simple consequence of this is that if you put the microphone directly on a nodal line, there is no way you can get feedback on that mode.
As we have seen in this section, feedback is a rather complex phenomenon and it may not be so clear why we are studying it or what use it has. The first step is to just try to get a sense of what feedback is. In the next section, we will consider feedback in a much broader context and show the many important applications of feedback.