Laboratory #8: Gain and Feedback
Objective:
In this lab we will study the phenomena of feedback in acoustic systems in a controlled way. The controlled use of feedback is very useful in a variety of applications. It is also the essence of what makes lasers possible. However, creating the right conditions for controlled feedback can be rather tricky.
Equipment:
- Computer and PASCO software with LAB#8.
- Small speaker, microphone and amplifier in AMP setting.
- Computer speaker with built in amplifier.
- Rectangular cavity.
- Ruler
Diagram: Top View.
Instructions:
- Start up PASCO software and open the file Lab8.sws. Make sure there are no gaps around the edge of the cavity.
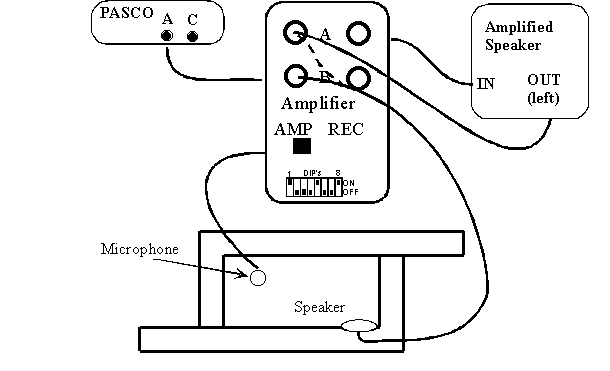
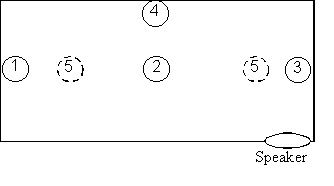
- VERIFY that the amplifiers, microphone and speaker have been connected as shown. Note, we are only using the amplifier circuit in the large speaker, you won't hear it make any sound. Start with a cavity length of about 10 cm and place the microphone in location (1). See diagram below.
- Turn the volume knob down all of the way. Connect the red banana plug from the small speaker to the red banana plug already in Input A of the amplifier. This closes the loop and creates positive feedback.
- At this point you should not have feedback because the gain is below the threshold. SLOWLY turn up the volume, just until you start to hear feedback. The threshold is very sharp.
- If the feedback frequency is very high (>5000 Hz), change the cavity length by a few millimeters, or so, and try again. At some point you should get feedback in the range that we have typically used for these cavities.
- Measure and record the frequency of the feedback using the Frequency Spectrum window in the PASCO.
- Without touching the volume control, switch the small speaker from the input side of the PASCO box to the output side of the PASCO box.
- Set the PASCO function generator to a small amplitude (0.1 Volts) and set the frequency to the value measured in step 6). Use the Frequency Spectrum window.
- Vary the frequency of the PASCO function generator by about 30 Hz in each direction to verify that the feedback really occurred on a cavity mode.
- Measure the total gain by dividing the voltage of the PASCO output measured in the oscilloscope window by the voltage from the amplifier output.
- Go back to the feedback loop, i.e. connect the small speaker back to the output of the amplifier and place the microphones in locations (2), (3), (4) and (5). For (5) use the side were you DID NOT get the fundamental for locations (1) and (3).
- For each case, first predict which mode will give feedback, considering the nodal lines of the cavity.
DATA:
|
Mic position |
Expected mode |
Expected frequency |
Measured frequency |
Measured mode |
Total gain
at threshold |
|
1 |
|
|
|
|
|
|
2 |
|
|
|
|
|
|
3 |
|
|
|
|
|
|
4 |
|
|
|
|
|
|
5 |
|
|
|
|
|
Questions:
- Did the frequency of the feedback correspond to a cavity resonance, in each case? Note, you will have to calculate the frequencies for a rectangular cavity.
- What was the average total gain equal to when feedback occurred?
- Explain why your mode prediction was correct or incorrect?
- Notice, when feedback occurs, a frequency is generated by the system, all by itself. In all previous experiments, we had to generate a frequency from a function generator. Thus, feedback allows us to use the natural resonant frequencies of a cavity as a frequency source and standard. This is how high precision clocks are made. What factors will affect the stability of the frequency? In other words, why might the frequency drift from its initial value? Ignore catastrophic failures.